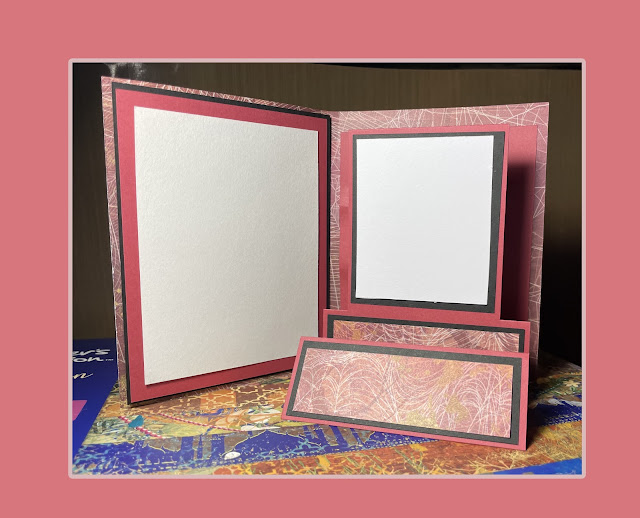
Cricut or hand cut. 5 X 7 pop up card.


The cricut link is just the base of the card and panels, that makes it free to cut. You can add your own designs..


The cricut pattern is done in greys, you can pick your own colors and patterns to match what you want to do.. you’ll need the score tool, fine point blade, glue, (I use Artglitter.com) glue and card stock. I used 8.5 x 11 card-stock two patterned, two solid colors, and a scrap of white to make the card…the rest will depend on how you design it…
….to cut by hand …
Main card (light grey) ... 10” x 7” ….score in half at 5 inches and the left side in half again at 2.5”.
(The squares will all be turned to be diamonds if you want to center patterned paper).
Color 1 (dark grey) 2 - (2 1/2” x 2 1/2”) (2.50”) and 1 - (3” x 3”) and for greeting a piece 3” x 1 1/4” or size of choice.
Color 2 (med grey) 2 - (2 1/4” x 2 1/4”) (2.25”) and 1 (2 5/8”) (2.6”)
Color 3 (grey) inside panels and pop up piece. 2 - (2 1/4” x 6 3/4”) (2.24 x 6.75) and 1 - (4 3/4” x 6.3/4”) (4.75 x 6.75) and pop up piece is (4 1/4” x 2”) (4.25 x 2) then score at each inch, with a 1/4” left over to glue together.
White scrap piece for greeting… 2 3/4”x 1”


Put together.
1. Fold main card at the two score lines, in a ‘Z’ shape. Fold at the middle, like a normal card, then fold the top piece back on itself.

2. Attach the 3 large panels to the card base (I glue, but double sided tape will work).

3. Fold all 4 the folds on the pop up piece and glue it into a box using the tab.

4. Mat the 3 diamonds and the greeting pieces by gluing the small pieces inside the larger.

5. Mark the center of the card, on the center fold and mark the center of the pop up box… glue the pop up box in, gluing two sides up against each side of the card…quickly close the card and open it several times, before the glue sets, to insure it opens and closes evenly.

6. If you hand cut you’ll need to snip off one corner to make the big Diamond fit inside the card when closed…it’s just a tiny snip… then glue that Diamond onto the pop up piece flush up against the fold of the card. Check to see it closes properly... corner should not hang over the edge of the closed card…might check after you snip, but before you glue.

7. Glue the two diamonds onto the front fold…glue just the left side of the card, even with the top and exactly centered over the fold. Repeat with the bottom Diamond, it will be even with the bottom, and just slightly over lapping the other Diamond.

8. Add a greeting to the white piece, glue to the mat…decorate the card as desired and place the greeting over the Diamond overlap, or anywhere you wish. The card will close flat to fit in a 5 x 7 envelope and then stands to show off all three diamonds..


No comments:
Post a Comment