This was actually one of the first instruction videos I ever made many years ago, so I apologize if its a little rough.
https://www.youtube.com/watch?v=h1pOn1TJ4Os&t=276s

 Instructions and tips for Iris folding.
What you will need to Iris fold.
Sisscors, craft knife, ruler, tape (single sided and double sided), ink pad, pop dots, cardstock, patterned paper and a blank card.
Note: The patterned paper doesn't actually have to be patterned, in fact I usually make sure at least one of my papers is solid or metallic, as it shows on the back and makes it easier to keep your patterns in order. Any kind of paper will work, I have used scrapbook paper, card stock, wrapping paper, ribbon and even fabric. I have even mixed types with no problems.

1. Select card stock and 4 (or 5 depending of which pattern you chose) matching papers.
2.Cut out stencil.
2.Select card stock for the main panel and cut it 5" x 7". You will trim it later, but that gives you plenty of room to get your pattern on.

4. Make paper strips. With ruler and craft knife cut at least 3 strips of paper of each pattern. Cut about 1/2" - 3/4" thick if you are using card stock or heavy paper and plan to edge them. If you are going to fold (paper only, the thinner the better) make them 3/4" to 1". (I prefer to edge them when making cards, it gives less bulk and you can use thicker paper or card stock.)
5. Run one edge of each strip across the ink pad. (gold, silver, copper, brown or black work best) if you plan to fold the edges you can skip this step and fold the edge of the paper about 1/3 over instead.
 6. Make a guide card. Tape a small piece of each paper pattern in order on a card and lable with the coresponding color or numbers on the chart. (see photo on right side). Well worth the trouble.
7. Attach panel to pattern. Tape the card face down on top of the pattern. Use two pieces of tape like hinges at the top of the piece. Do not tape it down anywhere else. You will want to be able to lift the panel to check the progress and catch any mistakes before they go too far. See #2 below
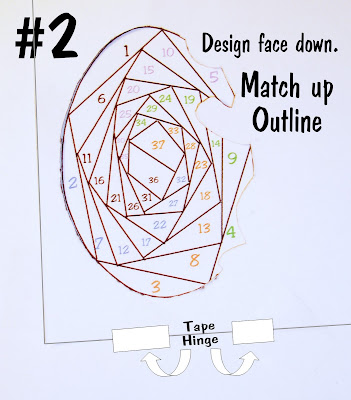


8. Start Filling in Pattern. Find #1 on the pattern and take the first color strip, cut a piece slightly longer that the area to be covered. Lay down the paper matching the edge up exactly to the black line. Tape down with small piece of
single sided tape. (I have also used a glue stick, it worked fine).

9. Move on to #2 and the next color. At times a color may be skipped as it is not needed to fill in the template design. Check carefully for this, as not to mess up the pattern. Now, follow the numbers and go around and around matching up colors until finished. Check front view at least every two rows to make sure you didn't make a mistake.
Don't worry if edges of paper stick out past the side of the panel, you can trim it later.

11. Put several pop dots around outside sections of the back of the panel and some double sided tape in the center where the paper and tape has built up. 
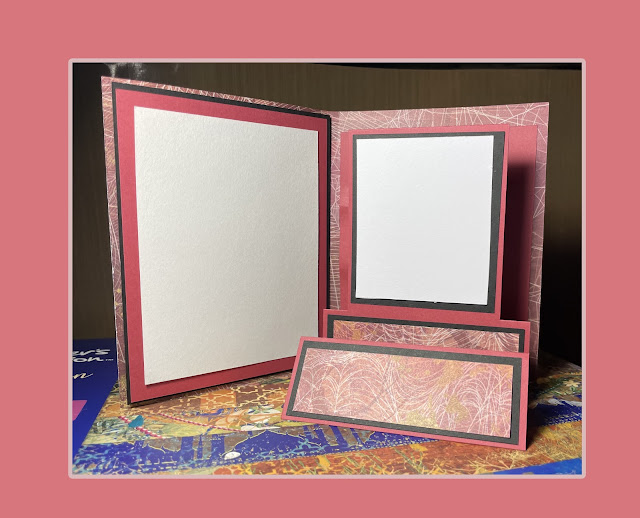
Attach to another panel or directly onto card. Embellish if desired.
Bunny with egg templates at far bottom, right click and save.
Bunny with egg templates at far bottom, right click and save.


No comments:
Post a Comment